Azure VMware Solution: A comprehensive guide to LDAPS identity integration - Part 3
Jan. 25, 2023Author(s): Robin Heringa and Fletcher Kelly
Implementing LDAPS identity integration with Azure VMware Solution series - 3 of 4
This is the third part of the blog series on how to implement LDAPS identity integration with Azure VMware Solution. Other parts of this series can be found here:
Implement LDAPS integration
The following sections will guide you through the required process step-by-step
Check domain controller certificates and LDAPS
It is important to validate that the identity provider (in most cases Active Directory) is configured to support LDAPS based authentication requests before continuing with the LDAPS integration setup.
For each domain controller that is designated for use with Azure VMware Solution, check if the required certificate(s) with the “server authentication” intended purpose are present in the computer certificate store. The “Certificates” snap-in for the Microsoft Management Console (mmc.exe) offers a simple way to do this.
After locally or remotely opening the computer certificate store:
- Expand the “Personal” certificate store and click “Certificates”;
- Check if the store contains certificates with the “Server Authentication” intended purpose.
Available certificates for avs-gwc-dc001.avsemea.com:
Available certificates for avs-gwc-dc002.avsemea.com:
Next we need to verify whether the Active Directory domain controllers are configured to offer LDAPS services:
- Open a “Command prompt” windows;
- Run the command “Netstat -a”;
- Verify that there is an active listener for TCP port 636.
LDAPS listener for avs-gwc-dc001.avsemea.com: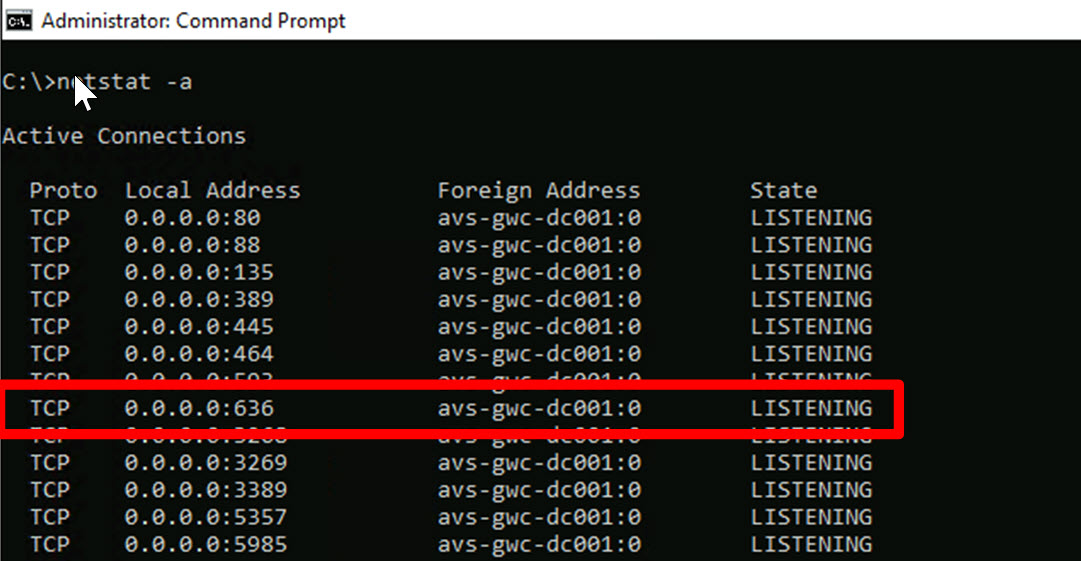
LDAPS listener for avs-gwc-dc002.avsemea.com: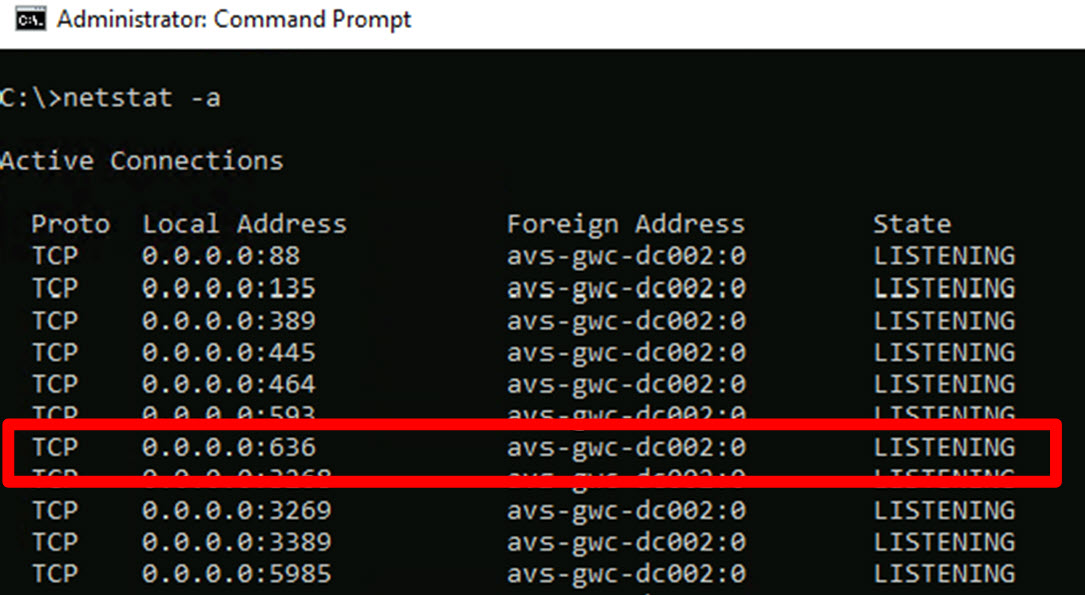
Extract (correct) domain controller certificates
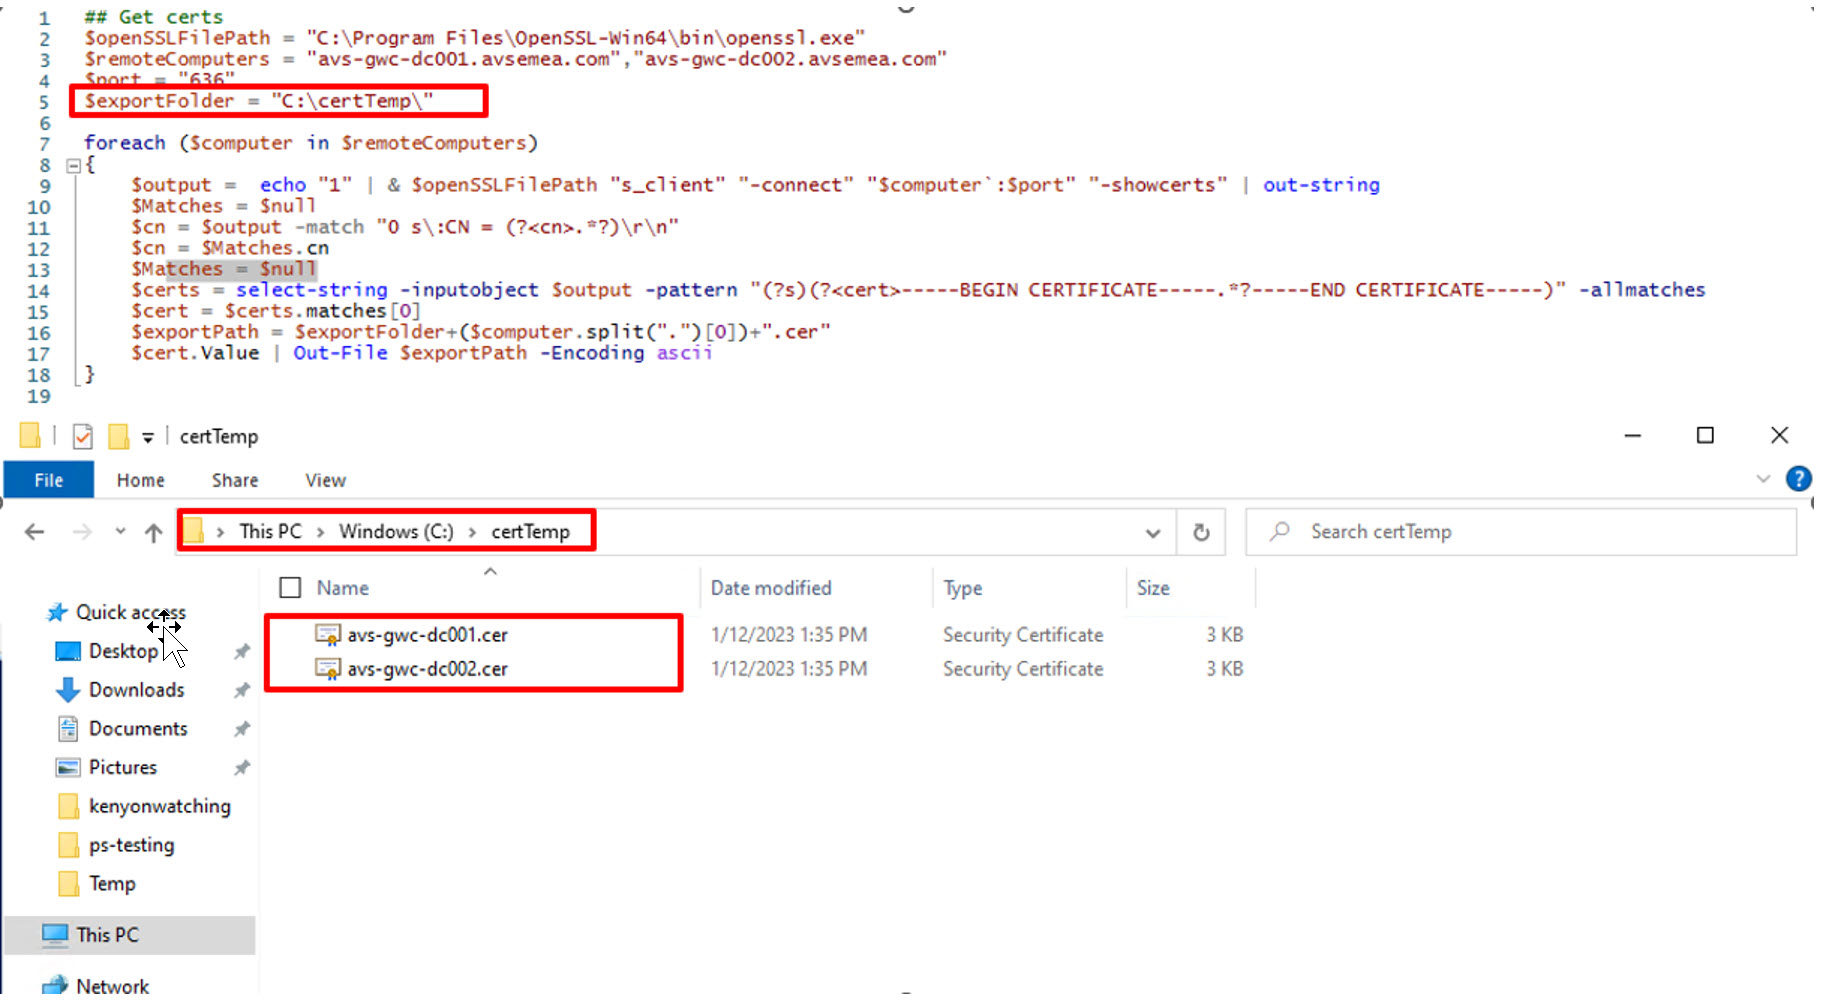
As a next step the certificates used by the domain controllers for LDAPS services need to be extracted from the domain controllers. This step is always performed by executing the script shown in the image below. The reason for this is to ensure we extract the correct certificate which is “attached” to the LDAPS service. When multiple certificates are available with the “Server Authentication” intended purpose, the domain controller selects one of them to be used for LDAPS.
With the following commands we will connect to the required domain controllers. In our scenario, these are avs-gwc-dc001.avsemea.com and avs-gwc-dc002.avsemea.com and we then use OpenSSL to extract the required certificates. You will need to specify the path of your openssl.exe, currently tested version is 3.0 and was installed with Chocolatey. Our install path is C:\Program Files\OpenSSL-Win64\bin\openssl.exe. You will need to update the export path to suit your needs, we chose to use c:\certTemp
Notes
$openSSLFilePath may need to be changed, was installed using chocolatey in our example.
$remoteComputers would need to be changed to suit your environment.
$exportFolder can be changed to something more suitable for your environment.
## Get certs
$openSSLFilePath = "C:\Program Files\OpenSSL-Win64\bin\openssl.exe"
$remoteComputers = "avs-gwc-dc001.avsemea.com","avs-gwc-dc002.avsemea.com"
$port = "636"
$exportFolder = "c:\temp\"

foreach ($computer in $remoteComputers)
{
    $output =  echo "1" | & $openSSLFilePath "s_client" "-connect" "$computer`:$port" "-showcerts" | out-string
    $Matches = $null
    $cn = $output -match "0 s\:CN = (?<cn>.*?)\r\n"
    $cn = $Matches.cn
    $Matches = $null
    $certs = select-string -inputobject $output -pattern "(?s)(?<cert>-----BEGIN CERTIFICATE-----.*?-----END CERTIFICATE-----)" -allmatches
    $cert = $certs.matches[0]
    $exportPath = $exportFolder+($computer.split(".")[0])+".cer"
    $cert.Value | Out-File $exportPath -Encoding ascii
}
Validate domain controller certificate requirements
The next step is to ensure that the certificate extraction was performed successfully. This will always be a manual step in the process.
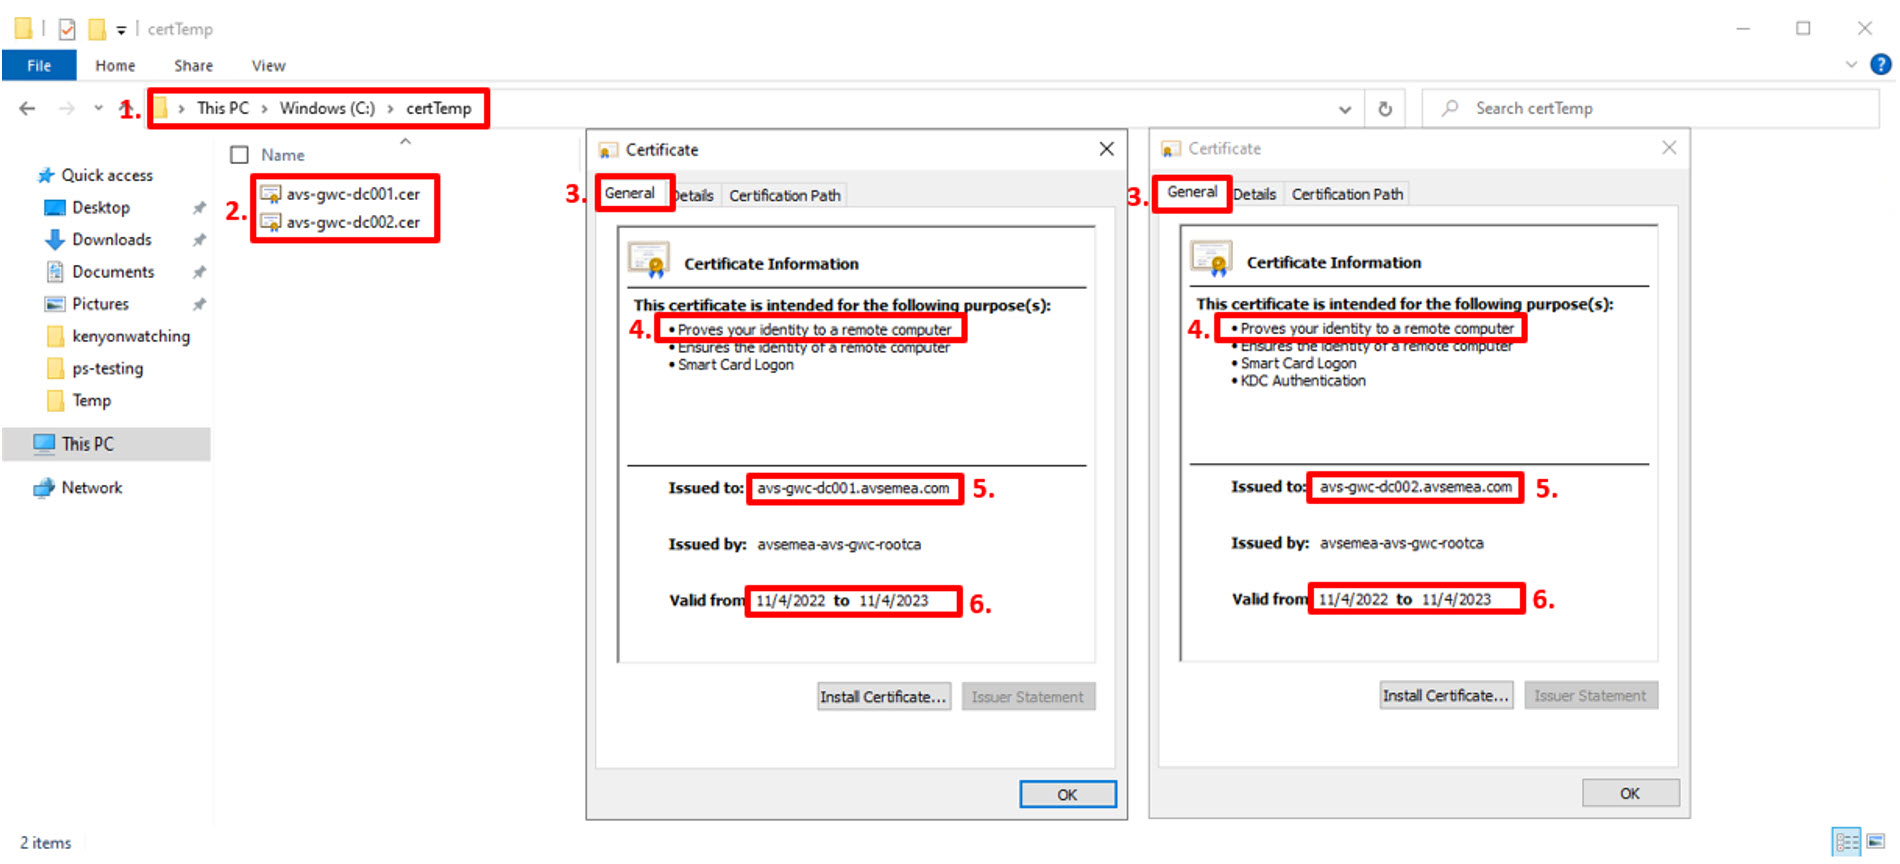
As displayed in the image above:
- Open Windows Explorer (or use the one opened in the previous step if not closed already 😊) and browse to the location where the certificates were extracted to. In our scenario the folder is c:\certTemp;
- Open the certificates by right-clicking and selecting “Open”
For each of the certificates:
- Select the “General” tab at the top;
- Verify that “Proves your identity to a remote computer” is available as an intended purpose;
- Verify that domain controller fully qualified domain name FQDN) is present in the “Issued to” field. In our scenario: avs-gwc-dc001.avsemea.com and avs-gwc-dc002.avsemea.com.
- Verify that the certificate is still valid by checking the “Valid from” field.
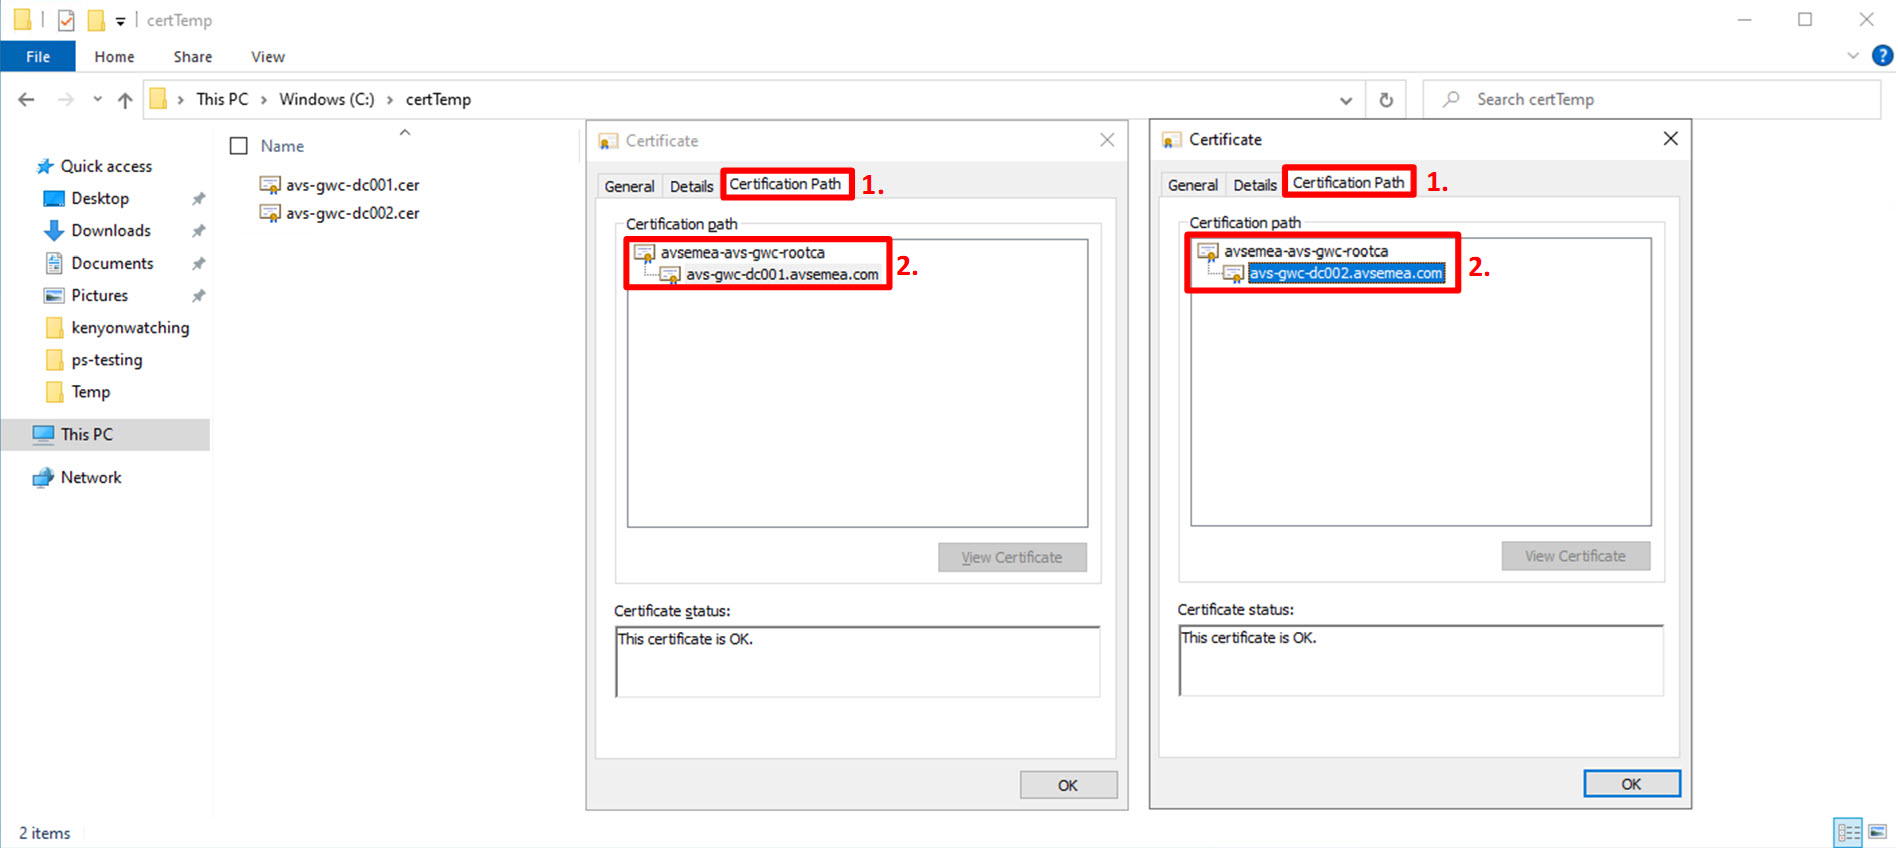
To complete the certificate verification process, for each certificate:
- Click the “Certification Path” tab at the top;
- Verify that the full certificate authority chain is available in the “Certification path” field. In our scenario the field contains the name of the root certification authority avsemea-avs-gwc-rootca and the full certificate name for the respective domain controller the certificate is issued to. In our scenario avs-gwc-dc001.avsemea.com and avs-gwc-dc002.avsemea.com.
Create Azure Storage account
The following content is divided into two sub-sections. One section will describe how the required procedure is performed manually through the Azure Portal and the other section describes a way to perform the required steps through automation.
Manual deployment
As part of this manual process a storage account will be created that is used to store the domain controller certificates for later use by the “New-LDAPSIdentitySource” run-command.
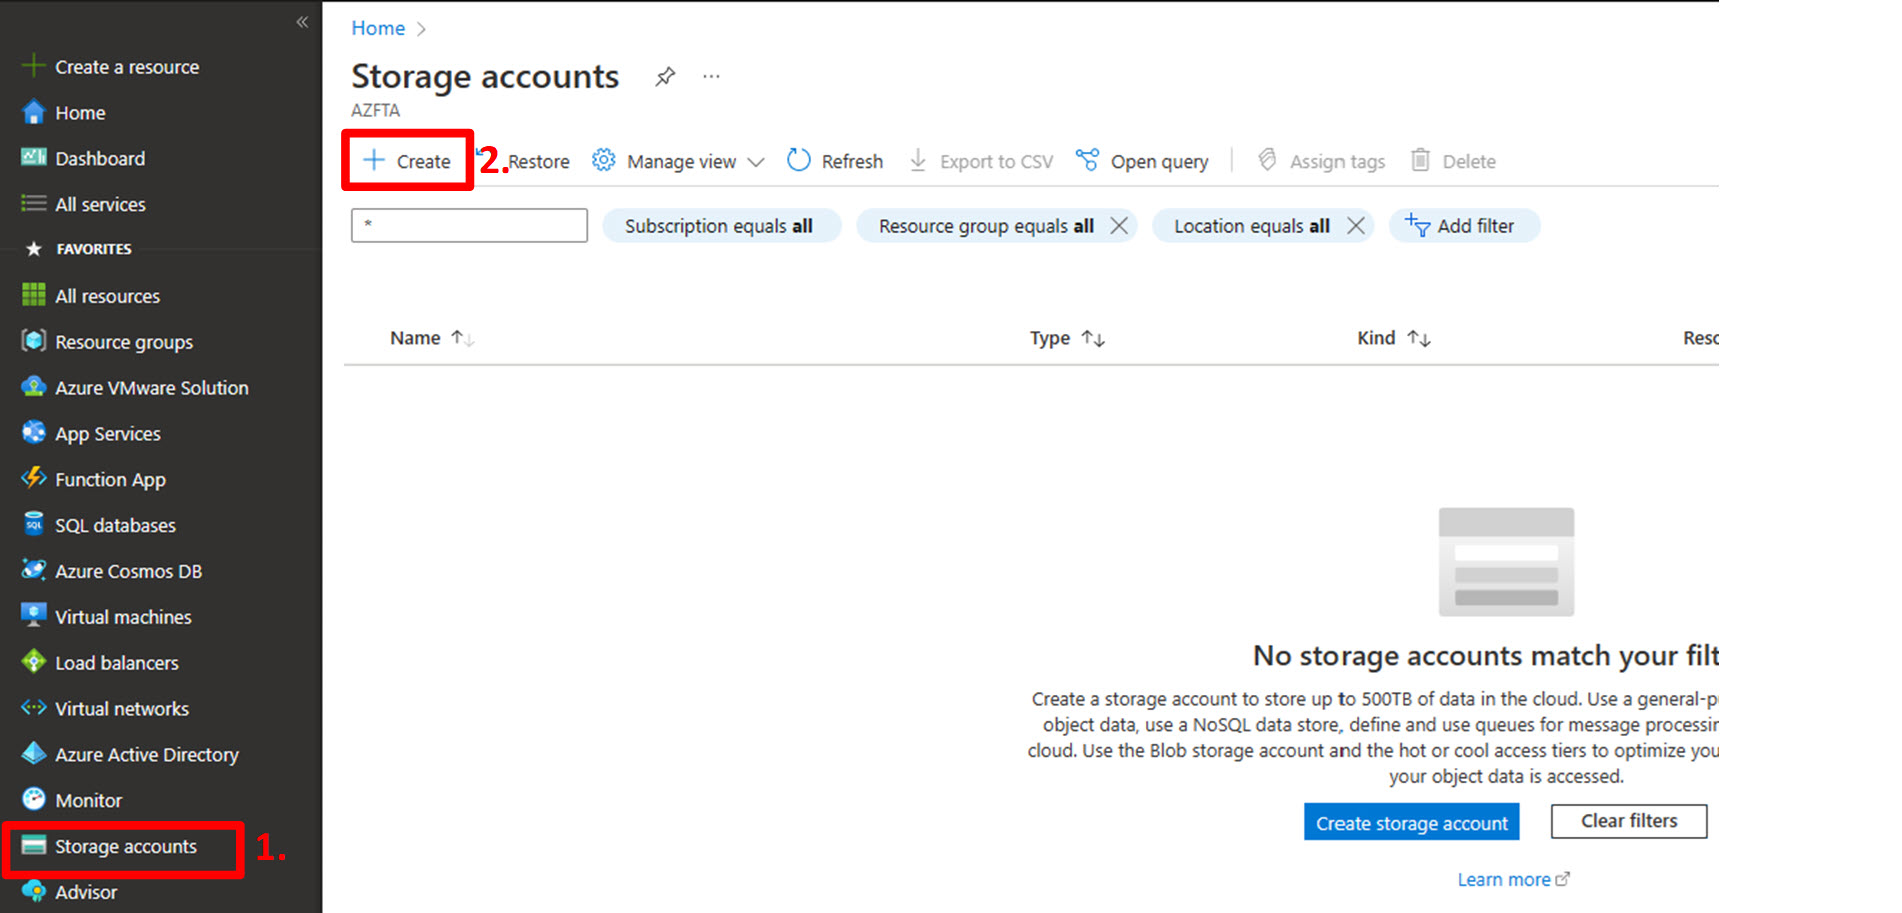
In the Azure Portal:
- Click on “Storage accounts” in the left navigation panel;
- Click “+ Create” at the top to create a new storage account. The “Create a storage account” blade will now be displayed.
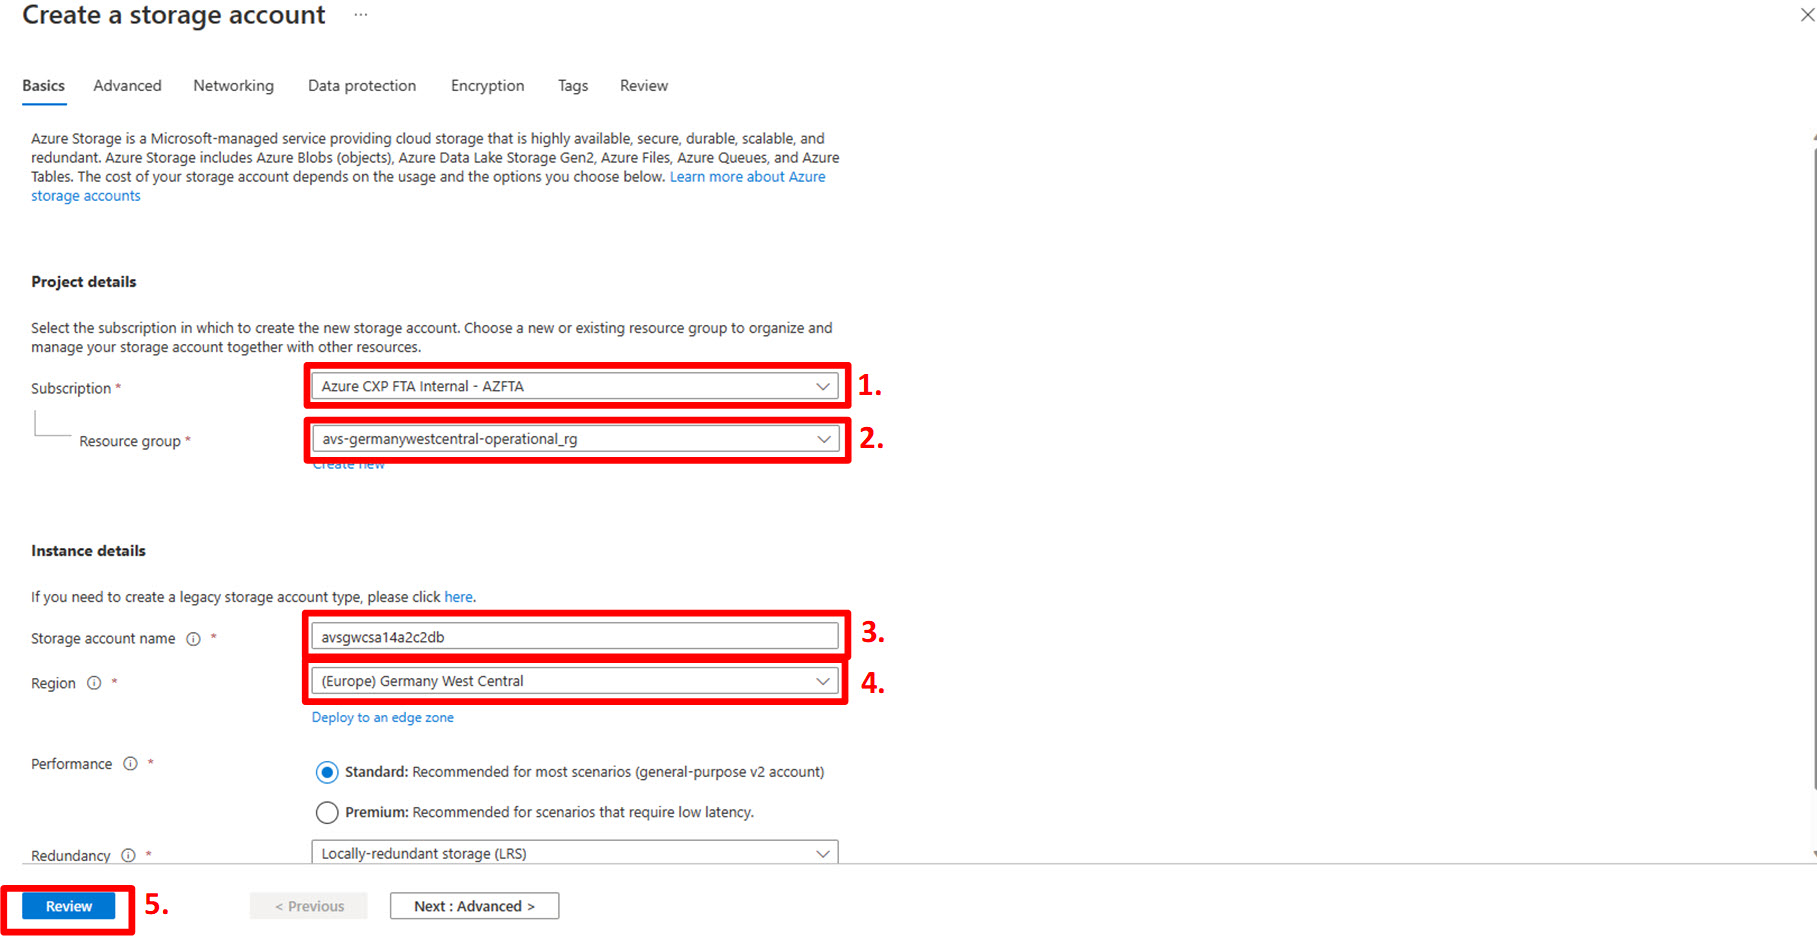
On the “basics” tab:
- In the “Subscription” drop-down menu make sure you select the subscription where Azure VMware Solution has been deployed into. In our scenario this is the Azure CXP FTA Internal – AZFTA subscription;
- Select the resource group you want to create the storage account into. In our case avs-germanywestcentral-operational_rg.
- In the “Storage account name” box, enter a globally unique name for the storage account. We recommend to use a descriptive name postfixed with a GUID. In our scenario we used avsgwcsa14a2c2db;
- In the “Region” drop-down menu be sure to select the same region as where Azure VMware Solution is deployed. In our scenario Germany West Central.
- As this storage account has no need for changing any of the default settings, click “Review” at the bottom of the screen.
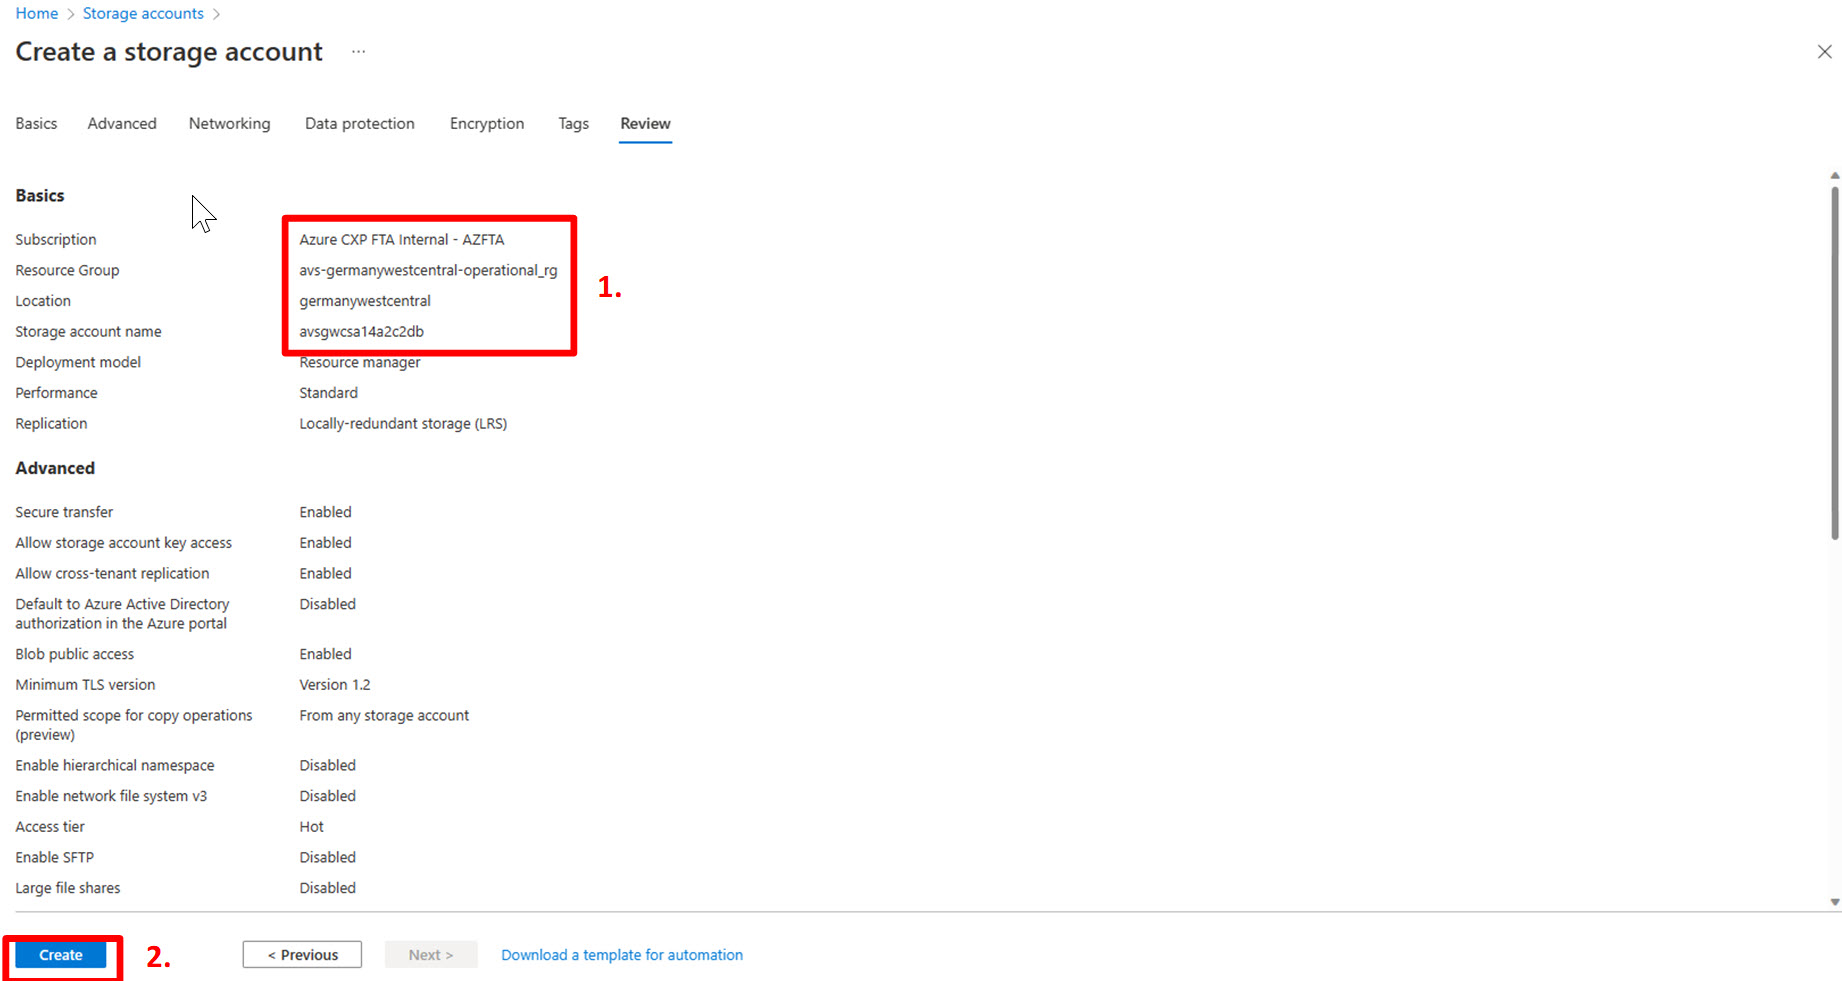
On the review screen:
- Double-check the values for “Subscription”, “Resource Group”, “Location” and “Storage account name”;
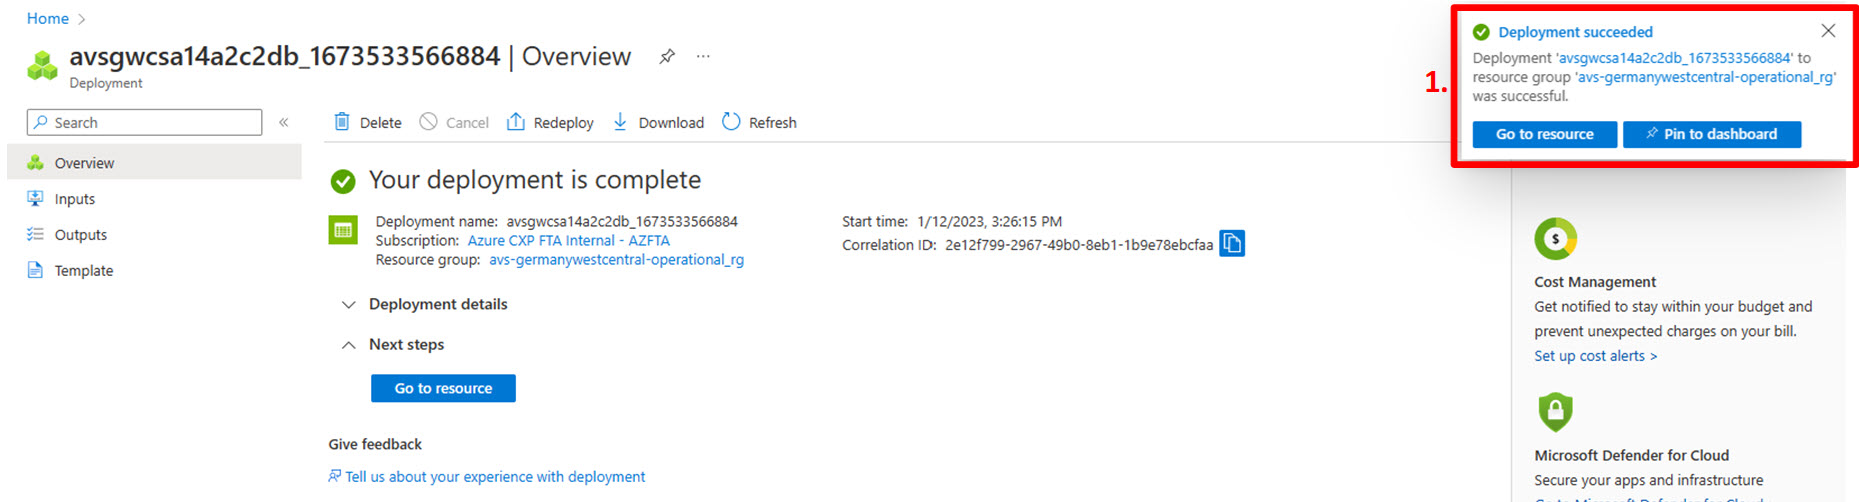
- Click “Create”. After a few minutes the creation of the storage account should be completed:
Automated deployment
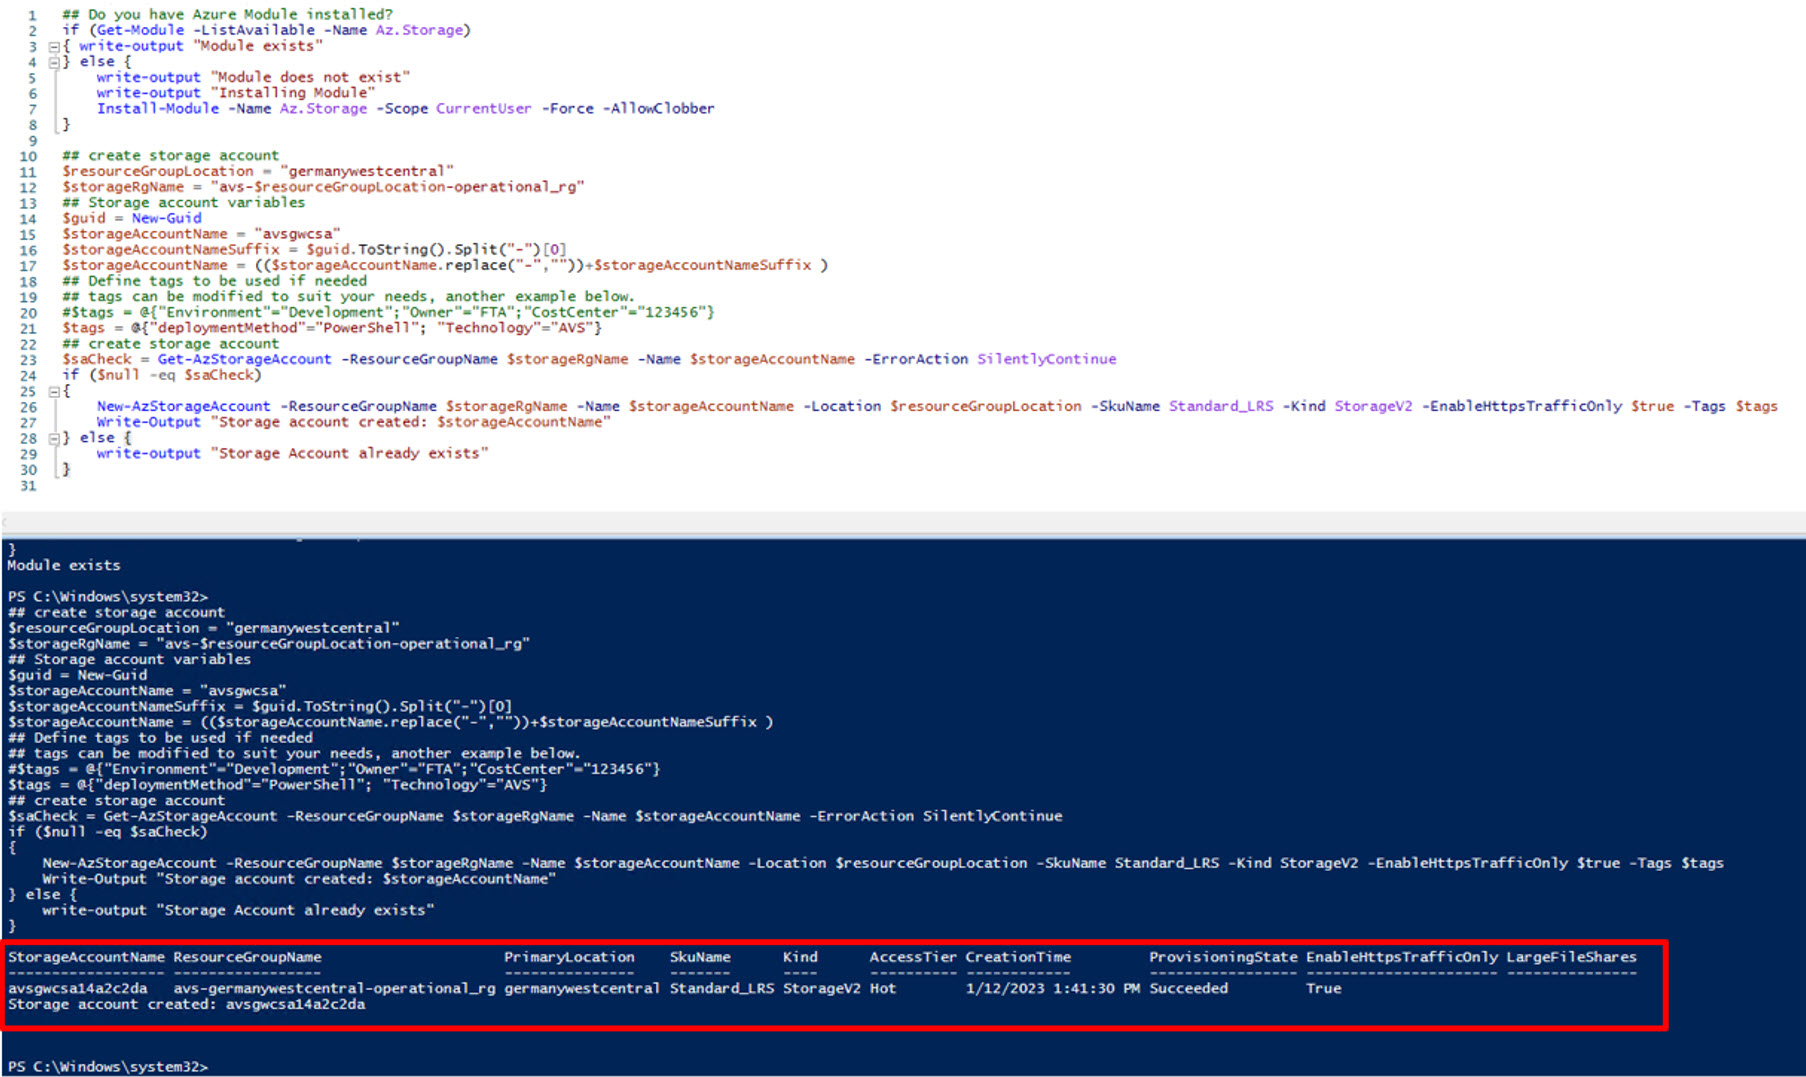
With these commands, we will check for the Azure Module, install them if missing and then continue the script. We will create the required storage account, or use an existing storage account. The $storageAccountName and $resourceGroupLocation variables can be updated or replaced as needed to meet your needs. These scripts are designed to be run in sections one after each other to ensure the variable names are correctly referenced.
Notes
$resourceGroupLocation will need to be updated to your desired location.
$storageRgName will need to be updated.
$storageAccountName will need to be updated.
## Do you have the Azure Module installed?
if (Get-Module -ListAvailable -Name Az.Storage)
    { write-output "Module exists" }
else
    {
    write-output "Module does not exist"
    write-output "installing Module"
    Install-Module -name Az.Storage -Scope CurrentUser -Force -AllowClobber
    }

## create storage account

$resourceGroupLocation = "germanywestcentral"
$storageRgName = "avs-$resourceGroupLocation-operational_rg"
## Storage account variables
$guid = New-Guid
$storageAccountName = "avsgwcsa"
$storageAccountNameSuffix = $guid.ToString().Split("-")[0]
$storageAccountName = (($storageAccountName.replace("-",""))+$storageAccountNameSuffix )
## Define tags to be used if needed
## tags can be modified to suit your needs, another example below.
#$tags = @{"Environment"="Development";"Owner"="FTA";"CostCenter"="123456"}
$tags = @{"deploymentMethod"="PowerShell"; "Technology"="AVS"}
## create storage account
$saCheck = Get-AzStorageAccount -ResourceGroupName $storageRgName -Name $storageAccountName -ErrorAction SilentlyContinue
if ($null -eq $saCheck)
{
    New-AzStorageAccount -ResourceGroupName $storageRgName -Name $storageAccountName -Location $resourceGroupLocation -SkuName Standard_LRS -Kind StorageV2 -EnableHttpsTrafficOnly $true -Tags $tags
    Write-Output "Storage account created: $storageAccountName"
} else {
    write-output "Storage Account already exists"
}
Create Storage Blob container
The next step is to create a blob container to help structure/organize the resources required for the LDAPS identity integration. The following content is divided into two sub-sections. One section will describe how the required procedure is performed manually through the Azure Portal and the other section describes a way to perform the required steps through automation.
Manual deployment
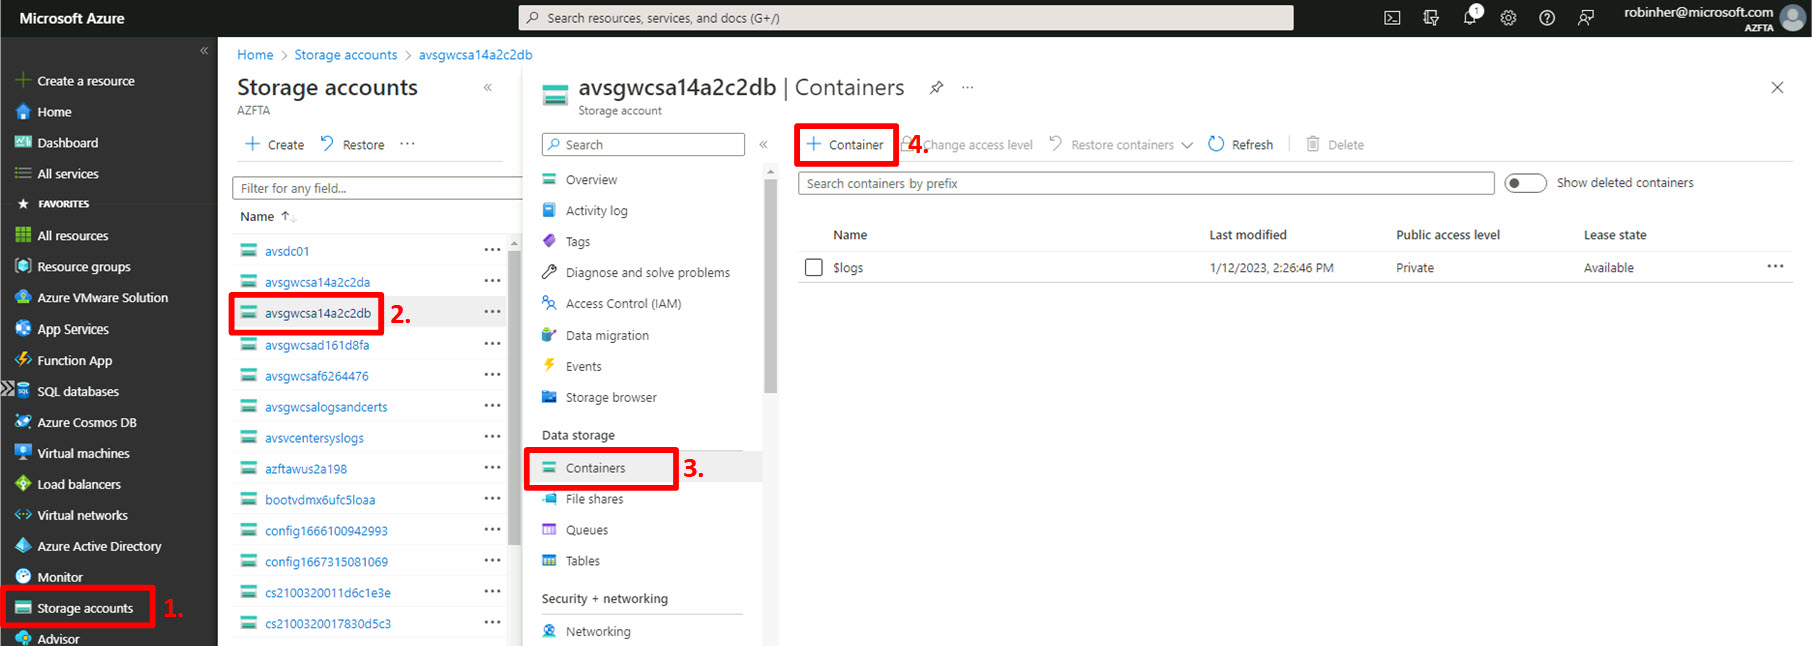
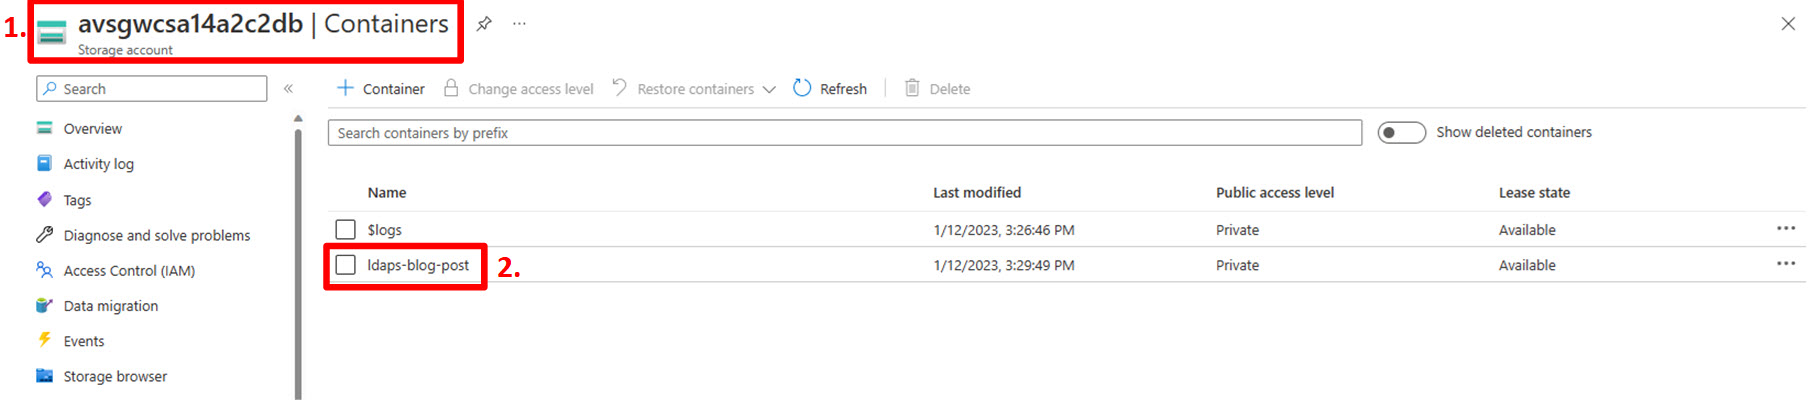
In the Azure Portal:
- In the left navigation pane, click “Storage accounts”;
- In the list of storage accounts, select the storage account created in the previous step. In our scenario avsgwcsa14a2c2db;
- Select “Containers” under the “Data storage” category;
- Click “+ Container” to create a new container in the storage account.
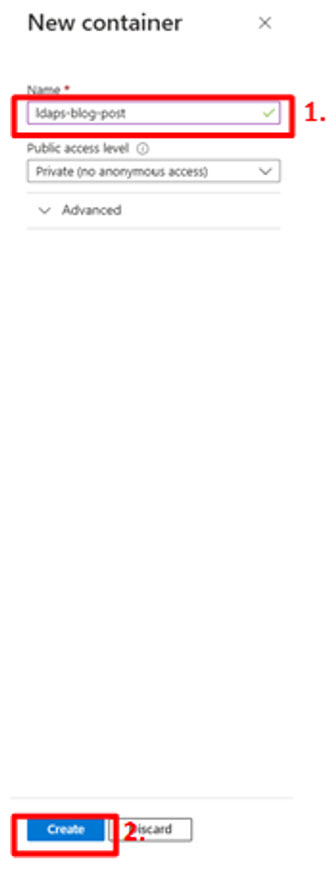
In the “New container” dialog:
- In the “Name” field, type a descriptive name for the new container. In our scenario ldaps-blog-post.
- Click “Create” The new container should now be created and displayed in the “Containers” view for the storage account:
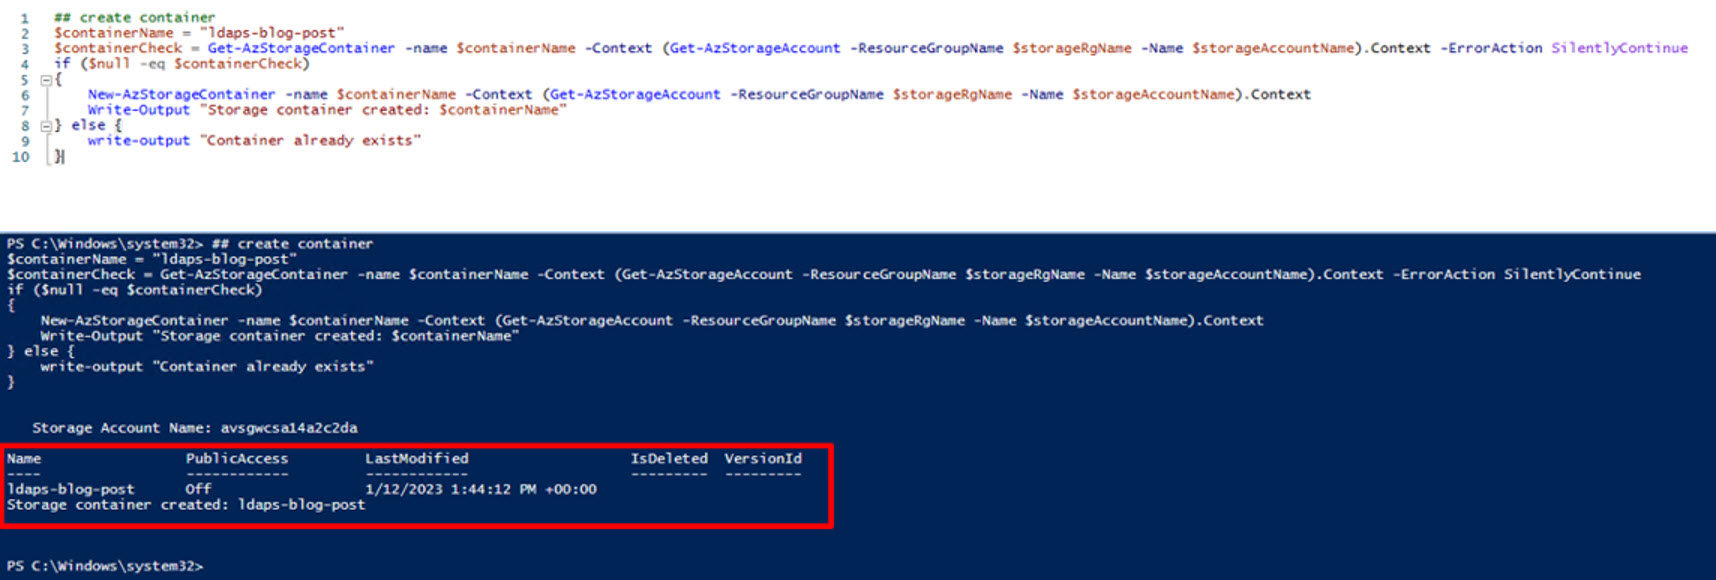
Automated deployment
With these commands, we will create the container to upload the earlier exported certificates to, this will be important for the creation of the SAS Tokens for the AVS LDAPS Run Command.
Notes
$containerName will need to be updated
## create container
$containerName = "ldaps-blog-post"
$containerCheck = Get-AzStorageContainer -name $containerName -Context (Get-AzStorageAccount -ResourceGroupName $storageRgName -Name $storageAccountName).Context -ErrorAction SilentlyContinue
if ($null -eq $containerCheck)
{
    New-AzStorageContainer -name $containerName -Context (Get-AzStorageAccount -ResourceGroupName $storageRgName -Name $storageAccountName).Context
    Write-Output "Storage container created: $containerName"
} else {
    write-output "Container already exists"
}
Upload domain controller certificates
The next step is to upload the domain controller certificates from the temporary folder where they were extracted to into the newly created ldaps-blog-post container in the avsgwcsa14a2c2db storage account we created. The following content is also divided into two sub-sections. One section will describe how the required procedure is performed manually through the Azure Portal and the other section describes a way to perform the required steps through automation.
Manual deployment
As the first step, it is needed to “enter” the ldaps-blog-post container in the storage account:
- In the Azure Portal, navigate to the avsgwcsa14a2c2db storage account created earlier and select “Containers”;
- Click the ldaps-blog-post container.
We will now upload the certificates into the container:
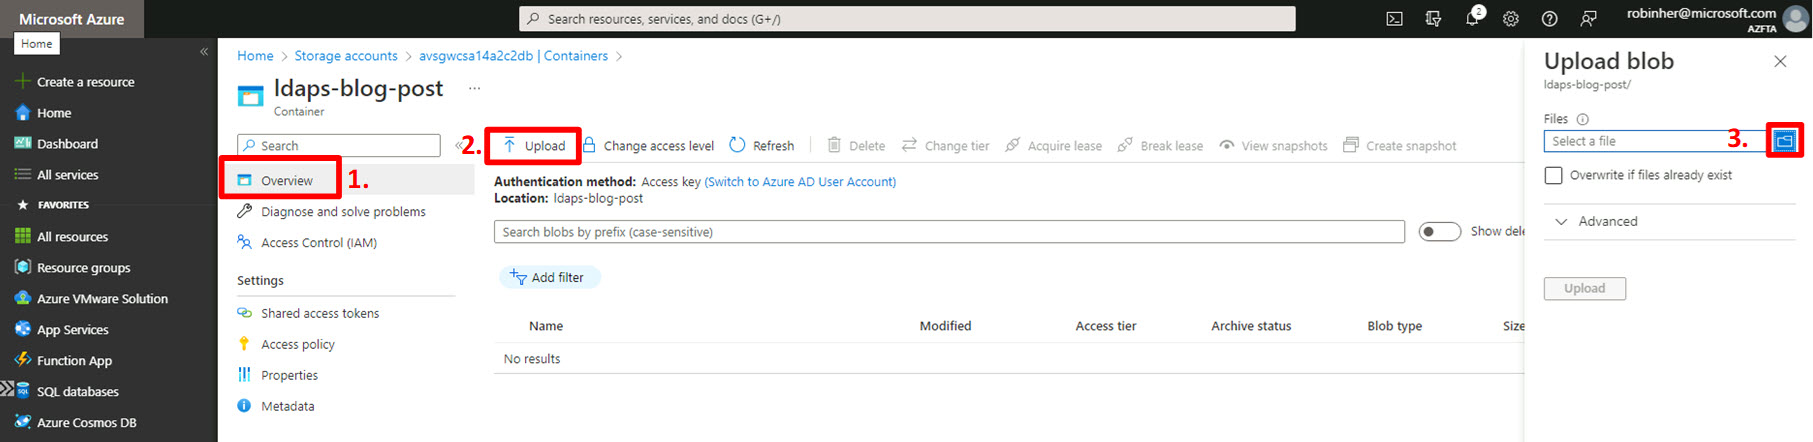
- In the ldaps-blog-post container, select “Overview”;
- In the top navigation, click “⬆️ Upload”;
- In the “Upload blob” panel, click the folder icon to select the certificates from your local hard drive.
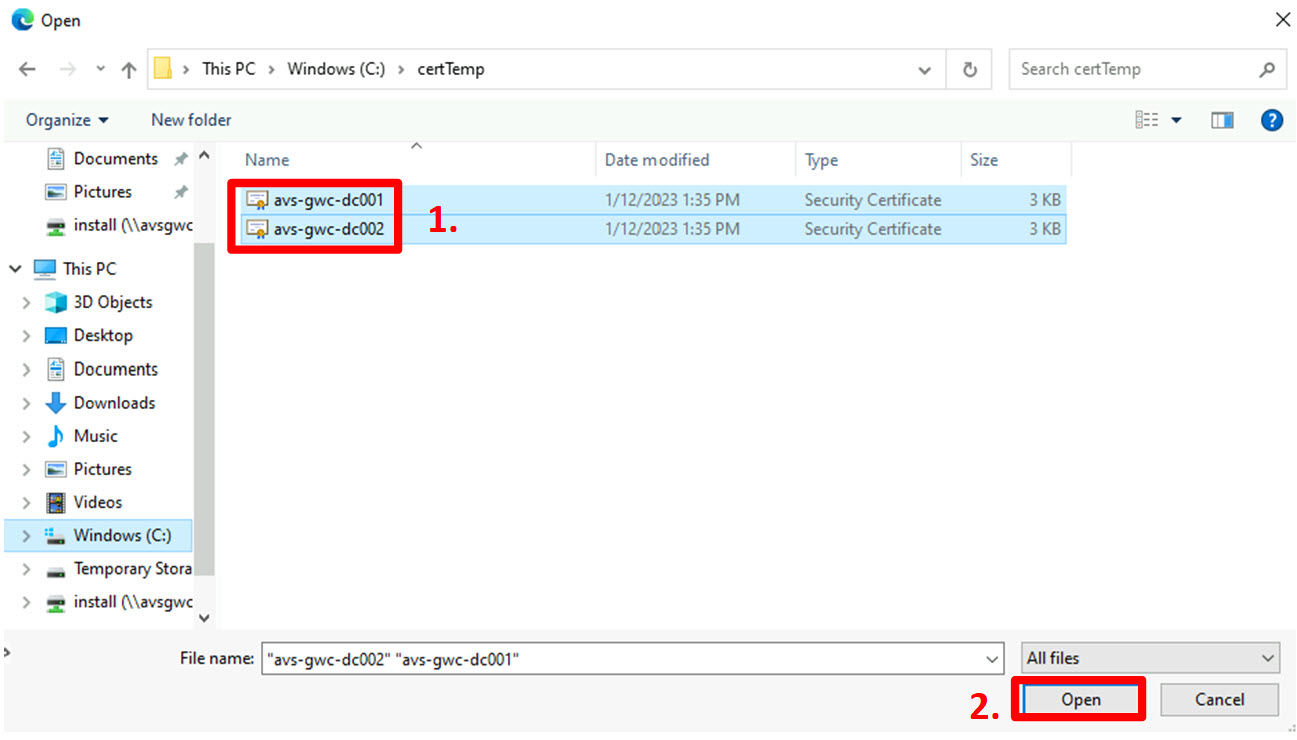
Navigate to the folder where the certificates have been extracted to (in our scenario c:\certTemp) and:
- Select all the certificates;
- Click “Open”.
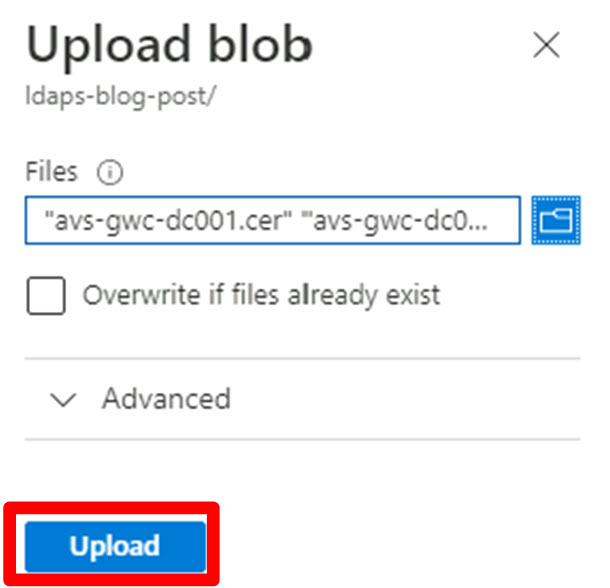
The “Open” screen will close and return to the Azure Portal “Upload blob” panel again, click “Upload” at the bottom of the screen:
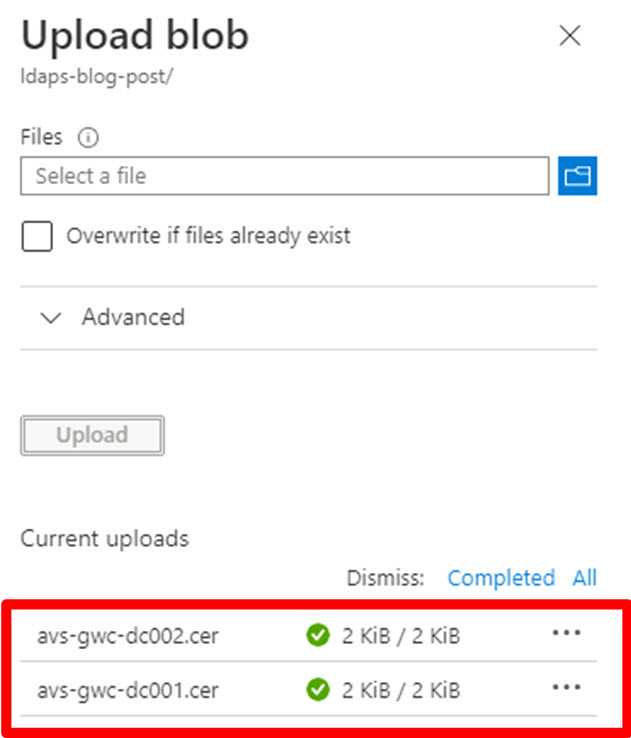
The certificates will now be uploaded into the blob container. The process is complete when green checkmarks are shown for each certificate uploaded:
Automated deployment
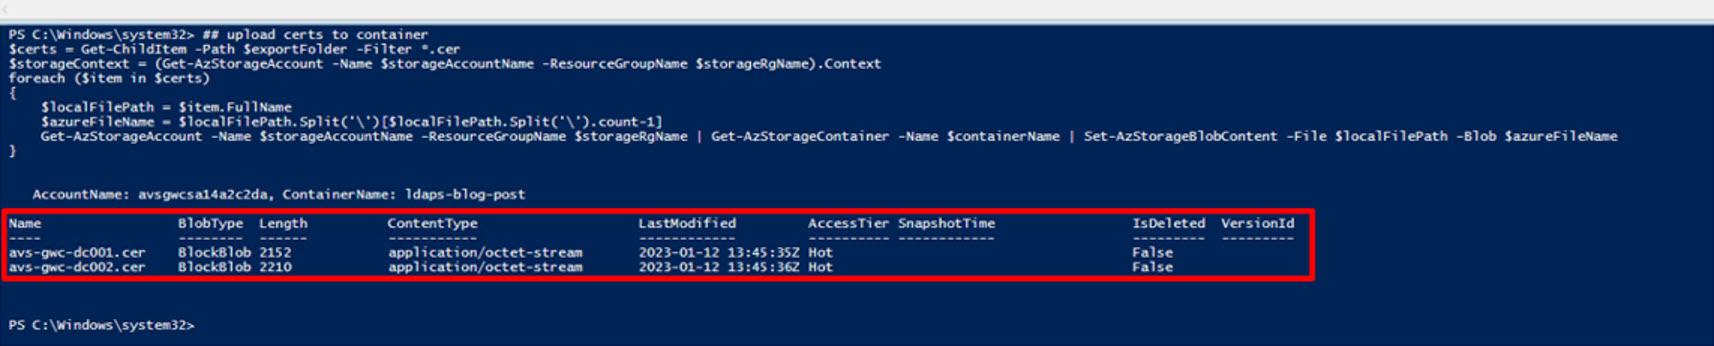
With these commands, we will upload the actual certificates into the previously created container. In this example we are using “ldaps-blog-post”
## upload certs to container
$certs = Get-ChildItem -Path $exportFolder -Filter *.cer
$storageContext = (Get-AzStorageAccount -Name $storageAccountName -ResourceGroupName $storageRgName).Context
foreach ($item in $certs)
{
    $localFilePath = $item.FullName
    $azureFileName = $localFilePath.Split('\')[$localFilePath.Split('\').count-1]
    Get-AzStorageAccount -Name $storageAccountName -ResourceGroupName $storageRgName | Get-AzStorageContainer -Name $containerName | Set-AzStorageBlobContent -File $localFilePath -Blob $azureFileName
}

Generate SAS tokens for domain controller certificates
As part of this step we will generate “shared access tokens” for all the certificates uploaded into the blob container so they can be accessed through the run-command for implementing the LDAPS integration for vCenter. One section describes how the required procedure is performed manually through the Azure Portal and the other section describes a way to perform the required steps through automation.
Manual deployment
The manual deployment continues within the same blade in the Azure Portal where the previous step left off. For each of the uploaded certificates, generate a “SAS token”:

For each certificate separately:
- Select the checkbox in front of the container;
- Click the ellipsis at the end of the line;
- Select “Generate SAS”.
In the following screen:
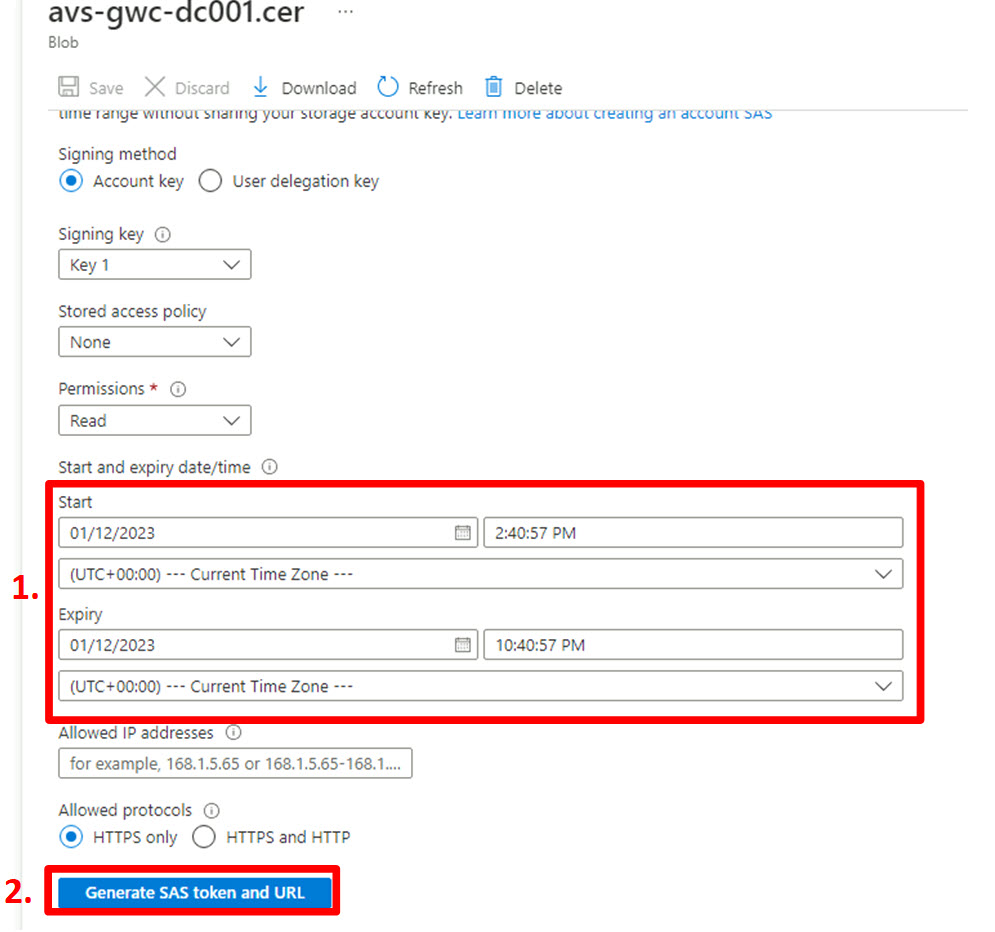
- Make sure to select a proper validity period for the SAS token. By default the SAS token will be valid for 8 hours which should be sufficient when performing the configuration in a continuous effort;
- Click “Generate SAS token and URL”. After clicking “Generate SAS token and URL” an additional section will be displayed at the bottom of the screen:
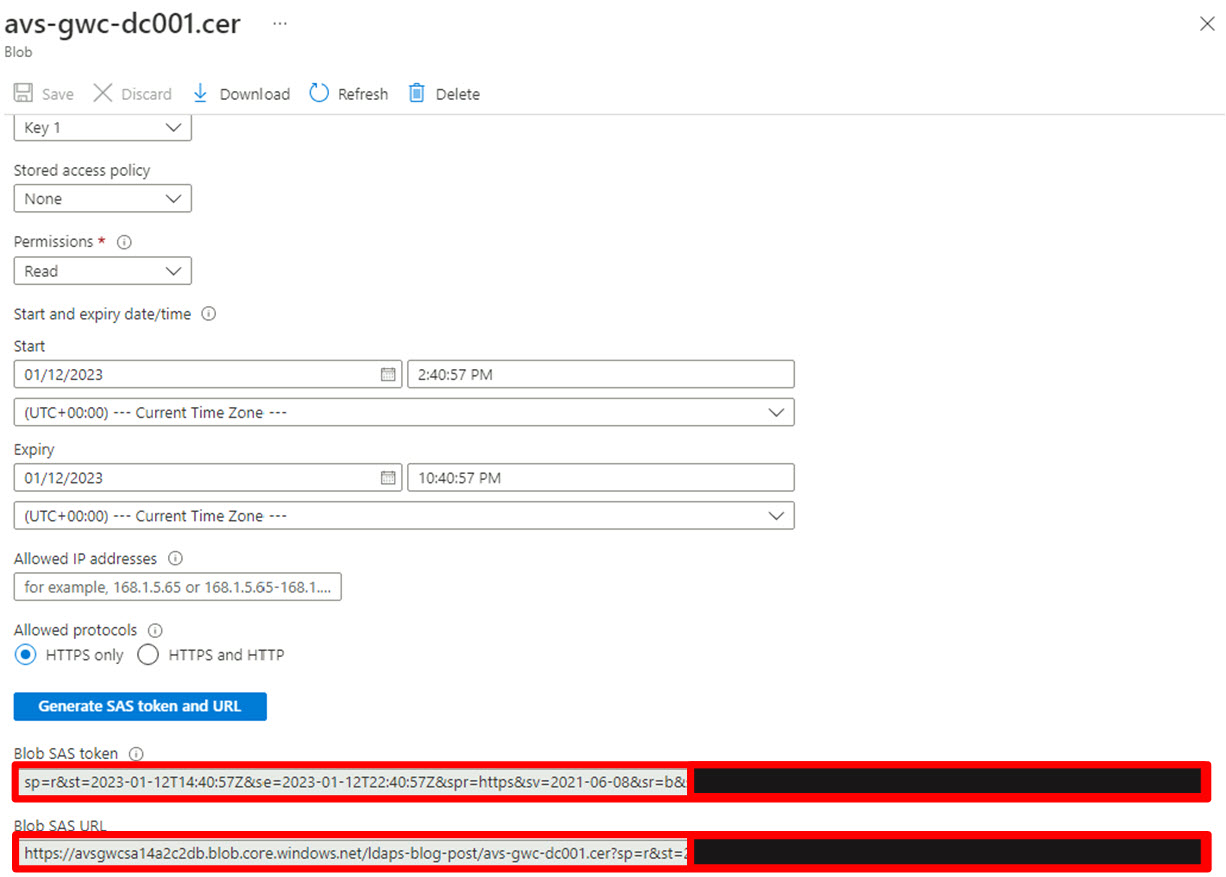
Be sure to copy the “Blob SAS URL” generated for each separate certificate into a text-file temporarily as they will need to be concatenated into a single string separated by a comma for use during the execution of the run-command as explained in step “Execute Run-Command”.
Automated deployment
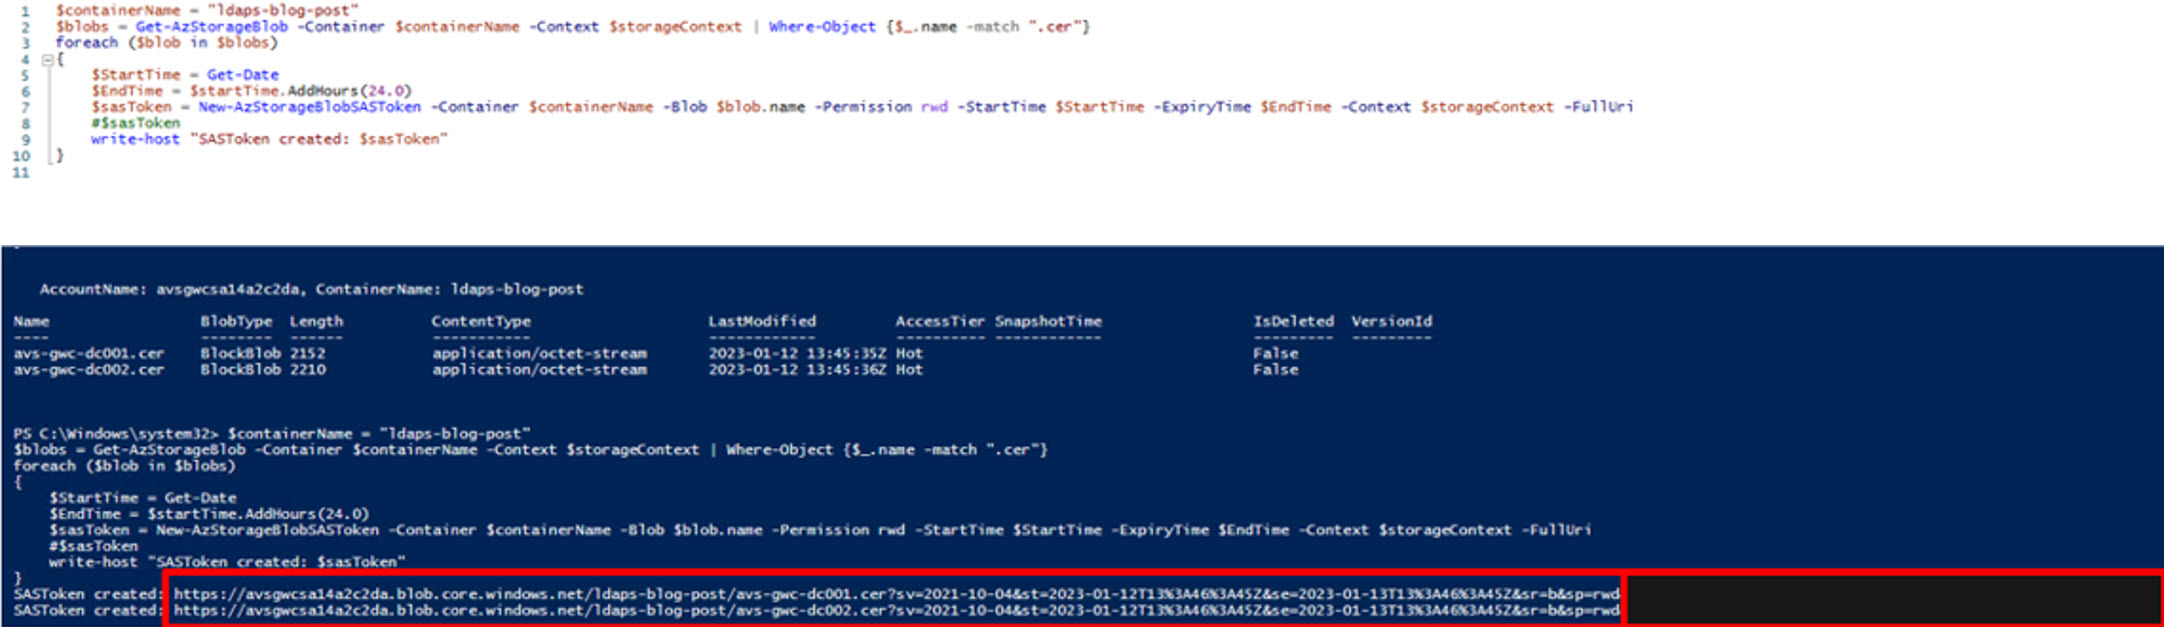
With these commands, we will generate the SAS Token needed for the next steps, please note down BOTH tokens. In this script, the tokens are valid for 24 hours and can be modified to suit your needs.
Notes
$containerName will need to be updated
## create SAS token
$containerName = "ldaps-blog-post"
$blobs = Get-AzStorageBlob -Container $containerName -Context $storageContext | Where-Object {$_.name -match ".cer"}
foreach ($blob in $blobs)
{
    $StartTime = Get-Date
    $EndTime = $startTime.AddHours(24.0)
    $sasToken = New-AzStorageBlobSASToken -Container $containerName -Blob $blob.name -Permission rwd -StartTime $StartTime -ExpiryTime $EndTime -Context $storageContext -FullUri
    #$sasToken
    write-host "SASToken created: $sasToken"
}